Welcome! Some of you may know me, but to those who don't, I'm Samdeman!
There are a lot of ways to map trees, but (For the moment), I'll only be covering 5.
I'll be doing this step-by-step, so be prepared for lots of text and visual references.
1: Official Method.
2: Natural Method
3: "Brick" Method
4: Line Method
5: Elevation Method
6: Multiple Tree Types Method
Disclaimer: This tutorial is primarily intended for use in fan games styled similar to Generation 3.
#1: Official Method
Let's start off with the Official Method! This method is the one you'll see in official games. Pretty simple, but there are some things to remember. Allow me to walk you through this strategy!
Step 1: Add your grass!
This step is extremely simple. Just add your grass tiles to Layer 1.

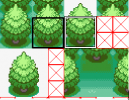
Step 2: Base Trees
Now, we lay our correct tiles out. Depending upon your tileset you could use a different way of laying out your trees, but this is the one I'm using (4 transparent tree tiles on Layer 2). Right now, it doesn't look great, but our next step will fix that.

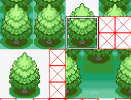
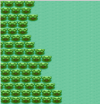
Step 3: Finishing Trees
This step will improve the look of our trees largely. You'll want to add the tops of your trees to the mix.
Let's add them on layer 3 (Or 2, depending on your method).

If all goes well, your trees should look similar to this.

There you have it! The official tree method!
#2: Natural Method
The Natural Method is one of the hardest and most time-consuming tree mapping methods, though it objectively has the best results. It looks very organic and natural. A lot of people may recognize the tiles and style, given as they are from Pokemon Nightshade. Let's get to mapping!
Step 1: Begin!
In this step, you'll add your grass, cliffs, and buildings. (If applicable.) Pretty simple. Remember to keep grass on layer 1, cliffs on layer 2/3, and buildings on layer 3.

Step 2: Add Trees (Basic
When mapping the trees in this style, there are a few things you should remember. First of all, remember to have variety (Eg. Multiple kinds of trees, Colors). It's important when trying to look natural. Also, try to refrain from using patterns. Finally, avoid wasted space. Having open space causes problems except when clearly on unwalkable space like cliffs.

Step 3: Add Trees (Final) and Decoration
Add your final trees, fill empty space, add one tile decoration, and just finish up.

I would love to see more games using this method, so thanks to those who do!

#3: "Brick" Method
This method is easy once you get the hang of it, even so, it's very aesthetically pleasing. The reasoning for it's name is due to the way to lay it out.
Step 1: Layout Planning.
Make your general layout using multiple trees, though make sure they're on the same "line."

Step 2: "Brick Laying"
Now. In this step, you'll want to take your trees, copy them, and lay them out like you would bricks. Not directly on top of each other, but slightly to the left/right. Occasionally, when making lots of trees, instead of directly repeating the pattern, you can vary the trees.

Step 3: Finish Up
Pretty basic. Just fix any tile errors you may have, do anything necessary to complete it.


#4: Line Method
A method typically employed for forests, not too many games use this strategy. Absolutely still worth learning, of course.
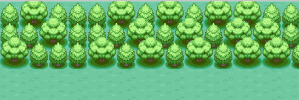
Step 1: Trees (Basic)
You'll want to lay out your trees in dynamic lines, at a slope of each other, but avoid being too diagonal. As you can see, there is no set pattern. Make sure it flows well and isn't blocky.

Step 2: Add Trees (Advanced)
Basically just finish up the trees, add some tree patches.

Step 3: Finish Up!

.

#5: Elevation Method
This method uses a lot of cliffs, beaches, mountains, etc, and then slightly dispersed trees.
Step 1: Grass, Cliffs, etc

Step 2: Trees (Basic)
You'll want to add your trees in clusters, though the occasional stray tree is fine. Using this method, on cliffs, open space is fine, but don't have too much.

Step 3: Trees (Advanced) + Decoration
Here you'll want to finish up your trees, along with filling up some too open space.


#6 Multiple Tree Types Method
This method requires a few tree types and colors, but it is what I consider the easiest "natural" method.
Step 1: Basic Tree Layout
When using this method, you'll want to use multiple types of trees in your tileset at the same level. Meaning, 2 tile tall trees won't work well with 3 tile tall trees, or 1 tile decoration tiles. Start off by grabbing your two trees and laying their basic parts down in a alternating checkerboard pattern. You can use the same tree-laying methods as the Official Method, just with multiple types of trees.

Step 2: Expand
Make your trees a bit more asymmetrical if needed. Add some features necessary for the layout. (You know the drill.)

Step 3: Add your decoration and finish up
At this point, you know what to do. Add your decoration and fix anything that needs fixing.

Aaaand... We are done! Thank you for reading through this absolute wall of a tutorial, and I hope to see more usage of these methods in the fan game community. If you have any tree mapping tutorial requests, message me on Discord at Samdeman123124#8795. (Also, please ignore my awkwardness.)
Note: Some of these maps (Excluding the trees, hopefully), aren't the best. I wanted to put the most effort into the focus of the tutorial.
There are a lot of ways to map trees, but (For the moment), I'll only be covering 5.
I'll be doing this step-by-step, so be prepared for lots of text and visual references.
1: Official Method.
2: Natural Method
3: "Brick" Method
4: Line Method
5: Elevation Method
6: Multiple Tree Types Method
Disclaimer: This tutorial is primarily intended for use in fan games styled similar to Generation 3.
#1: Official Method
Let's start off with the Official Method! This method is the one you'll see in official games. Pretty simple, but there are some things to remember. Allow me to walk you through this strategy!
Step 1: Add your grass!
This step is extremely simple. Just add your grass tiles to Layer 1.
Step 2: Base Trees
Now, we lay our correct tiles out. Depending upon your tileset you could use a different way of laying out your trees, but this is the one I'm using (4 transparent tree tiles on Layer 2). Right now, it doesn't look great, but our next step will fix that.
Step 3: Finishing Trees
This step will improve the look of our trees largely. You'll want to add the tops of your trees to the mix.
Let's add them on layer 3 (Or 2, depending on your method).
If all goes well, your trees should look similar to this.
There you have it! The official tree method!
#2: Natural Method
The Natural Method is one of the hardest and most time-consuming tree mapping methods, though it objectively has the best results. It looks very organic and natural. A lot of people may recognize the tiles and style, given as they are from Pokemon Nightshade. Let's get to mapping!
Step 1: Begin!
In this step, you'll add your grass, cliffs, and buildings. (If applicable.) Pretty simple. Remember to keep grass on layer 1, cliffs on layer 2/3, and buildings on layer 3.
Step 2: Add Trees (Basic
When mapping the trees in this style, there are a few things you should remember. First of all, remember to have variety (Eg. Multiple kinds of trees, Colors). It's important when trying to look natural. Also, try to refrain from using patterns. Finally, avoid wasted space. Having open space causes problems except when clearly on unwalkable space like cliffs.
Step 3: Add Trees (Final) and Decoration
Add your final trees, fill empty space, add one tile decoration, and just finish up.
I would love to see more games using this method, so thanks to those who do!
#3: "Brick" Method
This method is easy once you get the hang of it, even so, it's very aesthetically pleasing. The reasoning for it's name is due to the way to lay it out.
Step 1: Layout Planning.
Make your general layout using multiple trees, though make sure they're on the same "line."
Step 2: "Brick Laying"
Now. In this step, you'll want to take your trees, copy them, and lay them out like you would bricks. Not directly on top of each other, but slightly to the left/right. Occasionally, when making lots of trees, instead of directly repeating the pattern, you can vary the trees.
Step 3: Finish Up
Pretty basic. Just fix any tile errors you may have, do anything necessary to complete it.
#4: Line Method
A method typically employed for forests, not too many games use this strategy. Absolutely still worth learning, of course.
Step 1: Trees (Basic)
You'll want to lay out your trees in dynamic lines, at a slope of each other, but avoid being too diagonal. As you can see, there is no set pattern. Make sure it flows well and isn't blocky.
Step 2: Add Trees (Advanced)
Basically just finish up the trees, add some tree patches.
Step 3: Finish Up!
.
#5: Elevation Method
This method uses a lot of cliffs, beaches, mountains, etc, and then slightly dispersed trees.
Step 1: Grass, Cliffs, etc
Step 2: Trees (Basic)
You'll want to add your trees in clusters, though the occasional stray tree is fine. Using this method, on cliffs, open space is fine, but don't have too much.
Step 3: Trees (Advanced) + Decoration
Here you'll want to finish up your trees, along with filling up some too open space.
#6 Multiple Tree Types Method
This method requires a few tree types and colors, but it is what I consider the easiest "natural" method.
Step 1: Basic Tree Layout
When using this method, you'll want to use multiple types of trees in your tileset at the same level. Meaning, 2 tile tall trees won't work well with 3 tile tall trees, or 1 tile decoration tiles. Start off by grabbing your two trees and laying their basic parts down in a alternating checkerboard pattern. You can use the same tree-laying methods as the Official Method, just with multiple types of trees.
Step 2: Expand
Make your trees a bit more asymmetrical if needed. Add some features necessary for the layout. (You know the drill.)
Step 3: Add your decoration and finish up
At this point, you know what to do. Add your decoration and fix anything that needs fixing.
Aaaand... We are done! Thank you for reading through this absolute wall of a tutorial, and I hope to see more usage of these methods in the fan game community. If you have any tree mapping tutorial requests, message me on Discord at Samdeman123124#8795. (Also, please ignore my awkwardness.)
Note: Some of these maps (Excluding the trees, hopefully), aren't the best. I wanted to put the most effort into the focus of the tutorial.
- Credits
- (Credit not required)
Arma (Tutorial and Mapping inspiration)
Ekat (Mapping Inspiration)
Omega (aka /'peko'/) (Mapping Inspriration)
n1ck0411 (Test Map Demonstration & Writing Help)
Me (Mapping and Writing)