- Pokémon Essentials Version
- Non-applicable
Hi everyone ! I have finally developed the tiled to RMXP map converter, it took 48hours but now there's a working PoC :)
The software is named tiled2rxdata because it converts tmx files to rxdata files and build the Tilesets.rxdata file.
Git: https://gitlab.com/NuriYuri/tiled2rxdata
For some reasons, your tiled folder should contain all the .tmx and .tsx files in its root. (The images can be stored in subfolders as long as the tsx files gives the right path to them).
2. Tiled layer organization
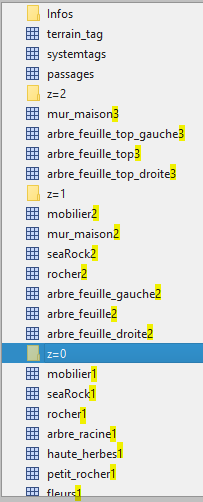
You have to organize your tiled layer on a particular way. First, you are required to have a "passages" layer using the "passages.tsx" tileset. It defines all the passages of your map (tiled2rxdata manage existing passages).
Use the following file in your passages.tsx tileset : https://image.communityscriptproject.com/tiled2rxdata/passages.png (chroma key = #FF00FF)
Next, you'll have to specify the RMXP tiles priority using a number at the end of your tiled layers name.
1 = no priority, 2 = *1, 3 = *2, 4 = *3, 5 = *4, 6 = *5
The layer organization should looks like this :

3. Tmx format
Your tmx should be formated like this :
- Orientation: orthogonal
- Renderorder : left-up
- Infinite : NO
- encoding : base64
- compression : gzip
4. Start tiled2rxdata
- Launch Game.exe
- Drag and drop you tiled folder to the terminal when it asks for the tiled project location.
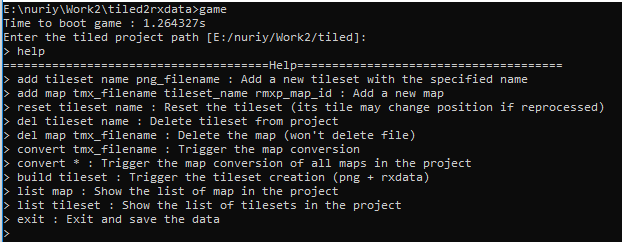
- Run the help command to get informations about commands :

5. Add a tileset
For tiled2rxdata, the tilesets are the manager of the RMXP tileset that will be saved in Tilesets.rxdata. They allow 16384 different tiles.
Run the add tileset command
Example : add tileset "My great Tileset" great_tileset.png
Use the reset tileset command if there's a tile overflow on your tileset and change some map tilesets (you can use the add map command).
6. Add a map
Run the add map command
Example : add map my_map.tmx "My great Tileset" 049
7. Convert a map
Run the convert command
Example : convert my_map.tmx
Important : All the maps should have been converted before building the tileset !
8. Build the tileset
Run build tileset.
9. Save your project
Run exit it'll save the project and stop the programm.
10. Retreive the result
Everything has been saved into the output folder of your tiled folder.
- SFML (Used by LiteRGSS)
- PSDK (Dev environnement)
- LiteRGSS (Image generation)
The software is named tiled2rxdata because it converts tmx files to rxdata files and build the Tilesets.rxdata file.
Links
Download: http://www.mediafire.com/file/sg3fcqqbf1o2qd9/tiled2rxdata.7z/fileGit: https://gitlab.com/NuriYuri/tiled2rxdata
Usage
1. Tiled folder organizationFor some reasons, your tiled folder should contain all the .tmx and .tsx files in its root. (The images can be stored in subfolders as long as the tsx files gives the right path to them).
2. Tiled layer organization
You have to organize your tiled layer on a particular way. First, you are required to have a "passages" layer using the "passages.tsx" tileset. It defines all the passages of your map (tiled2rxdata manage existing passages).
Use the following file in your passages.tsx tileset : https://image.communityscriptproject.com/tiled2rxdata/passages.png (chroma key = #FF00FF)
Next, you'll have to specify the RMXP tiles priority using a number at the end of your tiled layers name.
1 = no priority, 2 = *1, 3 = *2, 4 = *3, 5 = *4, 6 = *5
The layer organization should looks like this :

3. Tmx format
Your tmx should be formated like this :
- Orientation: orthogonal
- Renderorder : left-up
- Infinite : NO
- encoding : base64
- compression : gzip
4. Start tiled2rxdata
- Launch Game.exe
- Drag and drop you tiled folder to the terminal when it asks for the tiled project location.
- Run the help command to get informations about commands :

5. Add a tileset
For tiled2rxdata, the tilesets are the manager of the RMXP tileset that will be saved in Tilesets.rxdata. They allow 16384 different tiles.
Run the add tileset command
Example : add tileset "My great Tileset" great_tileset.png
Use the reset tileset command if there's a tile overflow on your tileset and change some map tilesets (you can use the add map command).
6. Add a map
Run the add map command
Example : add map my_map.tmx "My great Tileset" 049
7. Convert a map
Run the convert command
Example : convert my_map.tmx
Important : All the maps should have been converted before building the tileset !
8. Build the tileset
Run build tileset.
9. Save your project
Run exit it'll save the project and stop the programm.
10. Retreive the result
Everything has been saved into the output folder of your tiled folder.
Crédits
- Nuri Yuri (Script)- SFML (Used by LiteRGSS)
- PSDK (Dev environnement)
- LiteRGSS (Image generation)
- Credits
- - Nuri Yuri (Script)
- SFML (Used by LiteRGSS)
- PSDK (Dev environnement)
- LiteRGSS (Image generation)

