- Pokémon Essentials Version
- v21.1 ✅
- Also compatible with
- v21.1
- v21
- v20.1
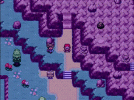
This tutorial outlines how to make events that function similarly to the bike obstacles as seen in Pokemon Ruby, Sapphire and Emerald. In those games the Mach bike is required to traverse these but this tutorial will assume the regular Pokemon essentials bike (from Fire Red / Leaf Green) is being used.
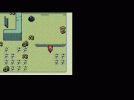
Examples shown below!
Step 1: Graphics
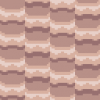
Shown below are the graphics you'll need for the events. These were ripped directly from Pokemon Emerald and edited to match the style of my tileset. They should be easy enough to recolour to match what is needed in your game!
The Muddy Slope graphic needs to be placed in Graphics>Characters, but the Cracked Tiles can be placed there or just within your tileset if you prefer.
Step 2a: Muddy Slope Event
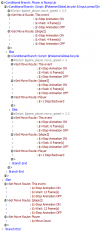
The Muddy Slope is split up into 2 events that are almost identical but I found this to work better than one event with size(1,2). Both events should be set to THROUGH and Player Touch.
The event named "slope 2" should be the top half of the slope and should be placed directly above the bottom half event.
The event for the top half should be exactly the same as the bottom half except changed to move the player 2 steps backward where appropriate (The check for facing up and on bicycle can be removed as it should be impossible to face up on the top tile without being on the bicycle). It also needs to be referencing the bottom slope event in place of "slope 2"
The changes to the player speed before being moved are just to make the movements look more consistent if the player tries to run up the slope and can be tweaked to your liking!
Note that the tiles underneath the Muddy Slope events need to be fully passable or the events will not function properly.
Your Muddy Slope should now be working!
Step 2b: Cracked Tile Event
This event is slightly more complicated than the Muddy Slope, requires being reset for each use, and has quite a few permutations to keep track of. I suspect that, in this case, using terrain tags would be more appropriate, but I have used events for now in my game.
Script for conditional branch on page 1:
The script above is for cracked tiles with all 4 edges open for the player to move to, such as the tile that the player falls down in the GIF above. For cracked tiles with obstacles on any of the edges, the check for inputs in the obstructed directions need to be removed or else the player will be able to sit in place over the hole without falling.
An example for the script to use on a cracked tile in the bottom left corner of a room (walls to the left and below the tile) is shown here:
The event pages 1 and 2 should also use the graphic for the crack and the hole respectively, and should both be set to THROUGH and Player Touch.
Finally, every cracked tile event should be reset open entering any room with them in. I do this by simply adding a script command to my ladders:
where 4 is the event number of the cracked tile. One of these commands needs to be added for each cracked tile in the room that needs resetting.
ALTERNATIVELY, if the cracked tiles teleport the player to a different map upon falling down, as opposed to a different position on the same map, the Control Self Switch: = A command on event page 1 can be swapped for a Script command calling setTempSwitchOn("A"), and the condition for page 2 can be the switch s:tsOn?("A") (this is Switch 21 by default in Essentials v21.1) instead of Self Switch A on. You would then not need an event that resets the self switches of every tile upon entering the room. - Credit to wrigty12 for informing me of this possibility!
This setup works pretty well, but the player can glitch out the event by swapping inputs just after moving onto tiles with 1 or more adjacent walls, allowing them to stay on top of an open hole. Please feel free to suggest ways this could be improved upon!
Step 3: Enjoy!
I hope someone finds this tutorial useful! Please feel free to comment if you find any problems and I will see if I can help you out!
P.S. Sorry if the formatting is really bad on this tutorial, it's my first one!
Examples shown below!
| Muddy Slope | Cracked Tiles: |

| 
|
Step 1: Graphics
Shown below are the graphics you'll need for the events. These were ripped directly from Pokemon Emerald and edited to match the style of my tileset. They should be easy enough to recolour to match what is needed in your game!
| Muddy slope: | Cracked Tiles: |

| 
|
The Muddy Slope graphic needs to be placed in Graphics>Characters, but the Cracked Tiles can be placed there or just within your tileset if you prefer.
Step 2a: Muddy Slope Event
The Muddy Slope is split up into 2 events that are almost identical but I found this to work better than one event with size(1,2). Both events should be set to THROUGH and Player Touch.
| Bottom Slope: | Script for 2nd conditional branch: |

| $PokemonGlobal.bicycle && Input.press?(Input::UP) |
The event named "slope 2" should be the top half of the slope and should be placed directly above the bottom half event.
The event for the top half should be exactly the same as the bottom half except changed to move the player 2 steps backward where appropriate (The check for facing up and on bicycle can be removed as it should be impossible to face up on the top tile without being on the bicycle). It also needs to be referencing the bottom slope event in place of "slope 2"
The changes to the player speed before being moved are just to make the movements look more consistent if the player tries to run up the slope and can be tweaked to your liking!
Note that the tiles underneath the Muddy Slope events need to be fully passable or the events will not function properly.
Your Muddy Slope should now be working!
Step 2b: Cracked Tile Event
This event is slightly more complicated than the Muddy Slope, requires being reset for each use, and has quite a few permutations to keep track of. I suspect that, in this case, using terrain tags would be more appropriate, but I have used events for now in my game.
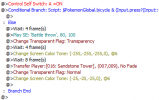
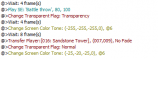
| Event page 1: | Event page 2 (requires self switch A to be on): |

| 
|
Script for conditional branch on page 1:
$PokemonGlobal.bicycle && (Input.press?(Input::UP) || Input.press?(Input::LEFT) || Input.press?(Input::RIGHT) || Input.press?(Input::DOWN))The script above is for cracked tiles with all 4 edges open for the player to move to, such as the tile that the player falls down in the GIF above. For cracked tiles with obstacles on any of the edges, the check for inputs in the obstructed directions need to be removed or else the player will be able to sit in place over the hole without falling.
An example for the script to use on a cracked tile in the bottom left corner of a room (walls to the left and below the tile) is shown here:
$PokemonGlobal.bicycle && (Input.press?(Input::UP) || Input.press?(Input::RIGHT))The event pages 1 and 2 should also use the graphic for the crack and the hole respectively, and should both be set to THROUGH and Player Touch.
Finally, every cracked tile event should be reset open entering any room with them in. I do this by simply adding a script command to my ladders:
pbSetSelfSwitch(4,"A",false)where 4 is the event number of the cracked tile. One of these commands needs to be added for each cracked tile in the room that needs resetting.
ALTERNATIVELY, if the cracked tiles teleport the player to a different map upon falling down, as opposed to a different position on the same map, the Control Self Switch: = A command on event page 1 can be swapped for a Script command calling setTempSwitchOn("A"), and the condition for page 2 can be the switch s:tsOn?("A") (this is Switch 21 by default in Essentials v21.1) instead of Self Switch A on. You would then not need an event that resets the self switches of every tile upon entering the room. - Credit to wrigty12 for informing me of this possibility!
This setup works pretty well, but the player can glitch out the event by swapping inputs just after moving onto tiles with 1 or more adjacent walls, allowing them to stay on top of an open hole. Please feel free to suggest ways this could be improved upon!
Step 3: Enjoy!
I hope someone finds this tutorial useful! Please feel free to comment if you find any problems and I will see if I can help you out!
P.S. Sorry if the formatting is really bad on this tutorial, it's my first one!
- Credits
- (Credit not required)

