- Pokémon Essentials Version
- v20.1 ➖
I have been interested in creating a fan-made game with a third gender/genderless option for a long time. Most to all support for this option that I have found however is for older versions of Pokémon Essentials.
So, I decided to work on scripting a way to add a completely separate and functional non-binary protagonist in a fan-made game programmed with Pokémon Essentials v20.1. Because of the lack of PE v20 non-binary support that I've been able to find, here I am sharing my finished and working product with everyone.
After each step along the way I provide an attached picture showing you the result and what to expect to see changed in your game. I hope whoever looks over this finds it helpful, useful, and easy to follow!
All I ask is that you credit accordingly in your works :)
Step 1: PBS File Alterations
[nb]
Name = Pokémon Trainer
Gender = 2
BaseMoney = 60
#-------------------------------
[3]
TrainerType = nb
WalkCharset = nb_walk
RunCharset = nb_run
CycleCharset = nb_bike
SurfCharset = nb_surf
FishCharset = nb_fish_offset
#-------------------------------
Please Note: These are examples, and you must find/make & use your own sprite sheets, the names of which should correlate with what we're inputting here. For instance, if you put "nb_walk" under "WalkCharset" like I've done here but don't have a sprite sheet in your "Characters" folder named "nb_walk" then you will run into issues.
Step 2: Script Alterations - UI_Load
(Note: I will be using RBG Hex for orange "FF9933, E67300" and its respective conversion base (255, 153, 51), and shadow (230, 115, 0) in all of the examples below in regard to color. If you do not want your non-binary text to appear orange, pick/make your own color)
^If this doesn't make sense to you now, it should as you continue following along :)
NBTEXTSHADOWCOLOR = Color.new(230, 115, 0)

Step 3: Script Alterations - UI_Save

Step 4: Script Alterations - UI_Summary
ownershadow = Color.new(176, 176, 176)
case @pokemon.owner.gender
when 0
ownerbase = Color.new(24, 112, 216)
ownershadow = Color.new(136, 168, 208)
when 1
ownerbase = Color.new(248, 56, 32)
ownershadow = Color.new(224, 152, 144)
when 2
ownerbase = Color.new(255, 153, 51)
ownershadow = Color.new(230, 115, 0)
end

Step 5: Script Alterations - UI_TrainerCard

Step 6: Script Alterations - UI_Pokegear

Step 6: Graphics & Naming Conventions


So, I decided to work on scripting a way to add a completely separate and functional non-binary protagonist in a fan-made game programmed with Pokémon Essentials v20.1. Because of the lack of PE v20 non-binary support that I've been able to find, here I am sharing my finished and working product with everyone.
After each step along the way I provide an attached picture showing you the result and what to expect to see changed in your game. I hope whoever looks over this finds it helpful, useful, and easy to follow!
All I ask is that you credit accordingly in your works :)
Step 1: PBS File Alterations
- Open your Pokemon Essentials PBS folder and then open "trainer_types.txt"
- You will need to make a new trainer type, the wiki can explain how to do this but it'll look something like this:
[nb]
Name = Pokémon Trainer
Gender = 2
BaseMoney = 60
#-------------------------------
- Make sure under "Gender =" you put one of the program's recognized options like "2". I'll be using "2" throughout this guide.
- Next go back to your Pokémon Essential PBS folder and then open "metadata.txt"
- You will need to make a playable protagonist that uses our new trainer type, it'll look something like this:
[3]
TrainerType = nb
WalkCharset = nb_walk
RunCharset = nb_run
CycleCharset = nb_bike
SurfCharset = nb_surf
FishCharset = nb_fish_offset
#-------------------------------
Please Note: These are examples, and you must find/make & use your own sprite sheets, the names of which should correlate with what we're inputting here. For instance, if you put "nb_walk" under "WalkCharset" like I've done here but don't have a sprite sheet in your "Characters" folder named "nb_walk" then you will run into issues.
Step 2: Script Alterations - UI_Load
(Note: I will be using RBG Hex for orange "FF9933, E67300" and its respective conversion base (255, 153, 51), and shadow (230, 115, 0) in all of the examples below in regard to color. If you do not want your non-binary text to appear orange, pick/make your own color)
^If this doesn't make sense to you now, it should as you continue following along :)
- Open up your project in RPGMXP and open up "Scripts". From here find "UI_Load" and then find lines 7-12. They should look something like this:
UI_Load lines 7-12:
  TEXTCOLOR             = Color.new(232, 232, 232)
  TEXTSHADOWCOLOR       = Color.new(136, 136, 136)
  MALETEXTCOLOR         = Color.new(56, 160, 248)
  MALETEXTSHADOWCOLOR   = Color.new(56, 104, 168)
  FEMALETEXTCOLOR       = Color.new(240, 72, 88)
FEMALETEXTSHADOWCOLOR = Color.new(160, 64, 64)- We will be adding two new lines directly beneath these, implementing our text color of choice. In my note above you'll see I'll be using orange for my non-binary text. Here are the two new lines to paste, I've even made the color specific lines of script orange, so you know where to paste your own chosen color:
NBTEXTSHADOWCOLOR = Color.new(230, 115, 0)
- Now, staying within "UI_Load" we are going to scroll down to line 80. The lines we'll tackle next should look something like this:
Overwrite These Lines:
        if @trainer.male?
          textpos.push([@trainer.name, 112, 70, 0, MALETEXTCOLOR, MALETEXTSHADOWCOLOR])
        else
        if @trainer.female?
          textpos.push([@trainer.name, 112, 70, 0, FEMALETEXTCOLOR, FEMALETEXTSHADOWCOLOR])
        else
          textpos.push([@trainer.name, 112, 70, 0, TEXTCOLOR, TEXTSHADOWCOLOR])
end- We will be replacing all of this with the below script lines:
Replace With These Lines:
        case @trainer.gender
        when 0 # Male
          textpos.push([@trainer.name, 112, 70, 0, MALETEXTCOLOR, MALETEXTSHADOWCOLOR])
        when 1 # Female
          textpos.push([@trainer.name, 112, 70, 0, FEMALETEXTCOLOR, FEMALETEXTSHADOWCOLOR])
        when 2 # Nonbinary
          textpos.push([@trainer.name, 112, 70, 0, NBTEXTCOLOR, NBTEXTSHADOWCOLOR])
        else # just as insurance, probably won't ever run tbh
          textpos.push([@trainer.name, 112, 70, 0, TEXTCOLOR, TEXTSHADOWCOLOR])
end- This step is for displaying the player's gender within the load/continue screen.
Step 3: Script Alterations - UI_Save
- In your project open up "Scripts". From here find "UI_Save" and then find line 37. We will be making only a slight alteration to this line. The line in question should look like this:
- All we need to change is the third RGB Hex code to match our chosen color from "Step 2" above. My line now looks like this:
- This step is for displaying the player's gender during the saving screen.
Step 4: Script Alterations - UI_Summary
- In your project open up "Scripts". From here find "UI_Summary" and then find line 425. The lines we'll be altering/adding to should look something like this:
UI_Summary Lines:
      ownerbase   = Color.new(64, 64, 64)
      ownershadow = Color.new(176, 176, 176)
      case @pokemon.owner.gender
      when 0
        ownerbase = Color.new(24, 112, 216)
        ownershadow = Color.new(136, 168, 208)
      when 1
        ownerbase = Color.new(248, 56, 32)
        ownershadow = Color.new(224, 152, 144)
end- We're going to be adding to these lines to make use of our chosen non-binary color once again. The new lines and where to put them is shown below:
ownershadow = Color.new(176, 176, 176)
case @pokemon.owner.gender
when 0
ownerbase = Color.new(24, 112, 216)
ownershadow = Color.new(136, 168, 208)
when 1
ownerbase = Color.new(248, 56, 32)
ownershadow = Color.new(224, 152, 144)
when 2
ownerbase = Color.new(255, 153, 51)
ownershadow = Color.new(230, 115, 0)
end
- Once again, I've denoted the color specific sections with orange. It's important you remember to change these to match whatever RGB Hex code/color you've decided to choose for your non-binary text.
- This step is for displaying the owner's gender of a caught Pokémon on the Pokémon's summary screen.
Step 5: Script Alterations - UI_TrainerCard
- In your project open up "Scripts". From here find "UI_TrainerCard" and then find line 13. The lines we'll be altering/adding to should look something like this:
Overwrite These Lines:
    background = pbResolveBitmap(sprintf("Graphics/Pictures/Trainer Card/bg_f"))
    if $player.female? && background
      addBackgroundPlane(@sprites, "bg", "Trainer Card/bg_f", @viewport)
    else
      addBackgroundPlane(@sprites, "bg", "Trainer Card/bg", @viewport)
end- We will be replacing all of this with the below script lines:
Replace With These Lines:
    background = pbResolveBitmap(sprintf("Graphics/Pictures/Trainer Card/bg_1"))
    if $player.female? && background
      addBackgroundPlane(@sprites, "bg", "Trainer Card/bg_1", @viewport)
    else
    if $player.male? && background
      addBackgroundPlane(@sprites, "bg", "Trainer Card/bg", @viewport)
    else
      addBackgroundPlane(@sprites, "bg", "Trainer Card/bg_2", @viewport)
    end
end- Note that there are two "end" lines. This is very important; you will receive errors if the second "end" line is not placed as shown.
- Moving further down this page to what should now be line 23, it should look something this:
Overwrite These Lines:
    cardexists = pbResolveBitmap(sprintf("Graphics/Pictures/Trainer Card/card_f"))
    @sprites["card"] = IconSprite.new(0, 0, @viewport)
    if $player.female? && cardexists
      @sprites["card"].setBitmap("Graphics/Pictures/Trainer Card/card_f")
    else
      @sprites["card"].setBitmap("Graphics/Pictures/Trainer Card/card")
end- We will be replacing all of this with the below script lines:
Replace With These Lines:
    @sprites["card"] = IconSprite.new(0,0,@viewport)
    card_bg = sprintf("Graphics/Pictures/Trainer Card/card_%d",$player.gender)
    if pbResolveBitmap(card_bg)
      @sprites["card"].setBitmap(card_bg)
    else
      @sprites["card"].setBitmap("Graphics/Pictures/Trainer Card/card")
end- What these new lines do is change the file scheme for the trainer card backgrounds, as female would now be "card_1" instead of "card_f", male would now be "card_0" or simply "card", and the new gender is now "card_2". Additionally, the small background image file scheme has changed to match.
- This step is important for allowing us to have three unique trainer cards.
Step 6: Script Alterations - UI_Pokegear
- In your project open up "Scripts". From here find "UI_Pokegear" and then find line 17. The lines we'll be altering/adding to should look something like this:
Overwrite These Lines:
    if $player.female? && pbResolveBitmap(sprintf("Graphics/Pictures/Pokegear/icon_button_f"))
      @button = AnimatedBitmap.new("Graphics/Pictures/Pokegear/icon_button_f")
    else
      @button = AnimatedBitmap.new("Graphics/Pictures/Pokegear/icon_button")
end- We will be replacing all of this with the below script lines:
Replace With These Lines:
    if $player.female? && pbResolveBitmap(sprintf("Graphics/Pictures/Pokegear/icon_button_f"))
      @button = AnimatedBitmap.new("Graphics/Pictures/Pokegear/icon_button_f")
    else
    if $player.male? && pbResolveBitmap(sprintf("Graphics/Pictures/Pokegear/icon_button"))
      @button = AnimatedBitmap.new("Graphics/Pictures/Pokegear/icon_button")
    else
    pbResolveBitmap(sprintf("Graphics/Pictures/Pokegear/icon_button_2"))
      @button = AnimatedBitmap.new("Graphics/Pictures/Pokegear/icon_button_2")
    end
end- Note that there are two "end" lines. This is very important; you will receive errors if the second "end" line is not placed as shown.
- Moving further down this page to what should now be line 81, it should look something this:
Overwrite These Lines:
    if $player.female? && pbResolveBitmap(sprintf("Graphics/Pictures/Pokegear/bg_f"))
      @sprites["background"].setBitmap("Graphics/Pictures/Pokegear/bg_f")
    else
      @sprites["background"].setBitmap("Graphics/Pictures/Pokegear/bg")
end- We will be replacing all of this with the below script lines:
Replace With These Lines:
    if $player.female? && pbResolveBitmap(sprintf("Graphics/Pictures/Pokegear/bg_f"))
      @sprites["background"].setBitmap("Graphics/Pictures/Pokegear/bg_f")
    else
    if $player.male? && pbResolveBitmap(sprintf("Graphics/Pictures/Pokegear/bg"))
      @sprites["background"].setBitmap("Graphics/Pictures/Pokegear/bg")
    else
    pbResolveBitmap(sprintf("Graphics/Pictures/Pokegear/bg_2"))
      @sprites["background"].setBitmap("Graphics/Pictures/Pokegear/bg_2")
    end
end- Note (for the last time I swear) that there are two "end" lines. This is very important; you will receive errors if the second "end" line is not placed as shown.
- This step is important for allowing us to have three unique Pokégears.
Step 6: Graphics & Naming Conventions
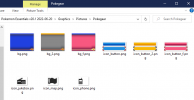
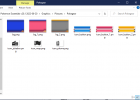
- Whew! That's it for all the heavy lifting. All that's left now is going to your Graphics folder>Pictures: sub-folders "Trainer Card" and "Pokegear" and renaming/adding a few things.
- Below you'll see screenshots of my respective folders to show you how to rename the graphics and what the insides of your folders should look like.
The End!
You did it! ... Well hopefully.
Feel free in the replies to ask for any further help if something seems to not be working as shown in my screenshots.
-Westrah
You did it! ... Well hopefully.
Feel free in the replies to ask for any further help if something seems to not be working as shown in my screenshots.
-Westrah
- Credits
- Vendily: Created something similar for PE v19 that I used as a reference for much of this. If you are using PE v19 go look at and follow Vendily's guide here.
EzBound: Created a script that I tweaked a bit a long time ago (found here) which got me really interested in making something that works for Pokemon Essentials v20.x